In the past two weeks I've been peeking in at every bakery/pastry shop I walk by to see their Christmas Logs or Bûches de Noël. It is the signature Christmas dessert here so it makes sense that every bakery has a selection.
I've seen traditional rolled cakes, ice cream log cakes, fruit mousse logs, and "buchettes", single serving Christmas logs. So what kind did I make? I made a traditional rolled cake, and then two cakes that you have seen before, the "bûche forêt noire", the black forest cake, and the "bûche royal chocolat", the royal chocolat cake. There is a lot of flexibility in what these bûches look like. Some do look like logs and some not at all. It does seem though that they consistently are long and narrow, as a log usually is.
So let's look at the first one I made, a traditional rolled bûche called:
Bûche Noisette (Hazelnut Log)
This cake has an almond cake base, a "biscuit amande", with a praline cream filling, on the inside and outside. Praline cream is a very common ingredient here and is either entirely made of hazelnuts, or half hazelnuts, half almonds. The praline cream we used is half hazelnuts, half almonds, that are caramelized and then ground into a paste.
The almond cake base: whipped egg whites and sugar are mixed with more eggs, almond flour, sugar and butter, then spread thinly on a sheet pan before baking.
The praline cream filling begins with a pastry cream, cooked on the stove. To cool it quickly, it is spread on a sheet pan, covered, and refrigerated. Once it has cooled, it is mixed with praline cream. Melted butter is added and finally whipped cream. The bûche can now be put together.
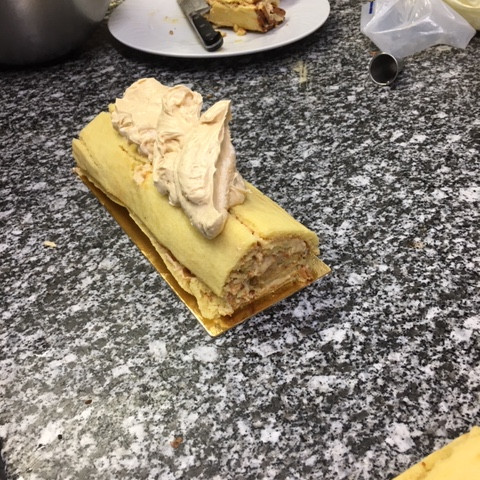
The baked cake is covered with the praline cream. To give some crunch to the cake, caramelized almonds are sprinkled over the cream before the whole thing is rolled up. This makes a pretty long log, so the ends (not so pretty, but good for snacking) are cut off and the log is cut in half and placed on a cake board. You'll notice the cake did crack a bit when rolled. Normally it should not do this and chef thought that maybe it was baked just a bit too long. It all gets covered and the flavor is not impacted, so no worries.
The exterior is covered with more praline cream and then garnished with chocolate decorations that the pastry shop had already prepared in advance.

I was running out of time at the end of the class and had to quickly finish the outside of the bûche. It is a rustic log!
Bûche Royal Chocolat
This bûche has a very different look because it is flat. It is also different from many because it does not need to be baked. With only two components it is quite easy to make.
Praline cream, that we also used in the Bûche Noisette, is mixed here with melted white chocolate and "feuilletine", a French confection that gives a nice crispiness to the base. The crunchy hazelnut base is leveled out and then topped with a chocolate mousse. It is then placed in the freezer to set.
The metal cake mold is removed and the cake is cut in half to fit a cake board. Melted chocolate is added to the sides and the top is covered with cocoa powder.

Once again chocolate decorations are added to the top. You can really go to town here, but I decided that less was a little bit more.
Bûche Forêt Noire (Black forest log)
You have seen this final cake before if you read my previous pastry class blogs. I like how one cake can be visually transformed into an entirely different cake. In fact, this is what many pastry shops do to make their bûches de Noël.
This cake is made up of three components: a "génoise chocolat", a chocolate sponge cake, chantilly cream, and chocolate chantilly cream.
To make the chocolate sponge, the recipe is simple: egg whites and sugar + flour and cocoa powder. You have to carefully fold in the flour and cocoa powder so that the eggs whites are not deflated. This gives the sponge its light and aerated aspect. A thin layer is spread over parchment on a sheet pan. It does not matter if the edges of the sponge are a bit ragged because the cake layers will be cut from the entire piece. Given the thinness of the cake, baking time is only 6-8 minutes.
Three rectangles are cut from our sponge cake. To create a rounded effect, each layer is cut a little narrower. Chantilly cream (sweetened whipped cream) is placed on the first layer, followed by a layer of raspberries and then more chantilly cream. A second cake layer is added, followed by chocolate chantilly cream and a final cake layer. Everything is then covered with a thin layer of chantilly cream.
Finishing touches: chocolate sprinkles, different from the ones available in the US, are added to the sides and chocolate curls or "des copeaux" to the top.

Doesn't that look cool! A log with lots of character and flavor!

Back in my apartment, I lined them up on my counter for their time in front of the camera. These beauties will be shared! One goes with us to friends where will will have dinner and the other two will be enjoyed by students who will be coming for afternoon tea. A fine way to celebrate this season!
Since this was my last pastry class, I should say that these classes have been such a delight to do!
I am excited to transport these pastry ideas back home and will spend a bit of time in January testing the recipes with American ingredients. I know already now that some products I will not have access to, but hopefully there will be a selection of French desserts for you to try soon. I can't wait to share them with you!


Comments